Getting Started With Jenkins
What is Jenkins?
Simple Definition
Jenkins is an open-source automation server that helps automate the process of building, testing, and deploying applications.
In simple words, it is a tool that runs tasks automatically so developers don’t have to do them manually again and again.
Why It Is Used
Jenkins is mainly used to enable CI/CD (Continuous Integration and Continuous Delivery).
This means:
Every time developers push code, Jenkins automatically checks it.
It builds the project, runs tests, and reports errors quickly.
It can also deploy the project automatically to servers.
Reasons Jenkins is used:
To save time by automating repetitive tasks
To detect bugs early
To make deployments faster and safer
To improve team productivity
To maintain consistent software delivery
Why Jenkins? (Benefits)
Jenkins is widely used in DevOps because it simplifies and accelerates the software development and delivery process. Below are the core benefits:
Continuous Integration (CI) and Continuous Delivery (CD)
Jenkins is primarily used to implement CI/CD pipelines.
Continuous Integration (CI):
Whenever a developer pushes code, Jenkins automatically fetches the latest changes, builds the project, and runs tests. This ensures errors are detected early in the development cycle.
Continuous Delivery (CD):
After successful testing, Jenkins can automatically deploy the application to servers or cloud environments, enabling smooth and consistent delivery.
Automation
Before Jenkins, build, test, and deployment processes were performed manually, which was slow and error prone.
Jenkins automates these repetitive tasks, including:
Code compilation
Running test suites
Deploying applications
Running scripts or commands
Generating reports
Automation significantly reduces manual effort and increases team productivity.
Faster Builds and Deployments
With automated checks and deployments, developers receive quicker feedback, and applications can be delivered faster.
This leads to:
Faster release cycles
Early bug detection
More reliable deployments
Improved overall development efficiency
Jenkins Architecture
Jenkins follows a simple yet powerful architecture consisting of two main components: the Controller (Master) and Agents (Nodes). Understanding these components helps explain how Jenkins executes jobs efficiently.

Controller (Master)
The Jenkins Controller is the central part of the system. Its responsibilities include:
Managing the Jenkins UI and dashboard
Scheduling and distributing jobs
Maintaining configurations, plugins, and security settings
Monitoring overall system health
Although the controller can run jobs, its primary role is coordination and management.
Agent (Node)
Agents are machines (physical or virtual) that execute the actual tasks assigned by the controller.
An agent can run on:
A local machine
A remote Linux/Windows server
A Docker container
A cloud instance
Agents help distribute workloads, allowing multiple jobs to run in parallel and improving performance.
How a Job Runs in Jenkins
The basic flow of job execution in Jenkins is:
A developer pushes code to the source repository (e.g., GitHub).
Jenkins detects the change through a trigger or scheduled check.
The controller assigns the job to an available agent.
The agent pulls the latest code, builds it, and executes the defined steps (tests, scripts, deployments, etc.).
The agent sends the results back to the controller.
The controller displays build status, logs, and reports on the Jenkins dashboard.
Installing Jenkins
There are multiple ways to install Jenkins, but using Docker is one of the simplest and most efficient methods, especially for beginners. Below is a recommended approach followed by the basic setup steps.
Installing Jenkins Using Docker (Recommended)
Docker allows you to run Jenkins in an isolated container without manually configuring system dependencies.
Command to run Jenkins using Docker:
docker run -p 8080:8080 -p 50000:50000 jenkins/jenkins:lts
This command:
Pulls the Jenkins LTS (Long-Term Support) image
Exposes port 8080 for accessing Jenkins
Exposes port 50000 for agent communication
Starts Jenkins inside a container
Once the container is running, you can access Jenkins in a browser at:
http://localhost:8080
Basic Setup Steps
After starting Jenkins for the first time, follow these setup steps:
Unlock Jenkins:
Jenkins provides an initial admin password. You can retrieve it using the Docker logs or by checking the Jenkins home directory inside the container.Install Suggested Plugins:
Jenkins recommends a default set of plugins needed for common tasks. Installing them ensures essential features are available immediately.Create an Admin User:
Set up a username, password, and email that you will use to log in.Configure Instance Settings:
Confirm the Jenkins URL and any other basic settings displayed during setup.Jenkins is Ready:
After completing these steps, Jenkins will redirect you to the dashboard, where you can start creating jobs.
Jenkins Dashboard Overview
Once Jenkins is installed and set up, the dashboard serves as the central interface for managing and monitoring all activities. Understanding the main sections of the dashboard helps you navigate Jenkins effectively.

Dashboard Components
1. Main Menu (Left Side Panel)
This panel provides access to essential options such as:
New Item: Create a new job or pipeline
People: View user information
Build History: View previously executed jobs
Manage Jenkins: Configure system settings, plugins, security, and tools
My Views: Create custom dashboard views
Credentials: Store and manage secrets (passwords, tokens, SSH keys)
2. Job List
The central area displays all existing Jenkins jobs. For each job, you can see:
Job name
Current build status
Last build result
Build activity trends
This section provides a quick overview of ongoing and past tasks.
3. Build History (Right Side Panel or Page)
Shows a timeline of recent builds with their status:
Successful (blue/green)
Failed (red)
Unstable (yellow)
You can click on any build to view detailed logs and results.
4. Manage Jenkins
This is the most important administrative section, where you can:
Install or update plugins
Manage global settings
Configure tools (JDK, Maven, Git)
Manage nodes and agents
Apply security settings
Backup and restore configurations
5. System Information and Logs
Provides detailed insights into system performance, environment variables, and Jenkins logs. Useful for troubleshooting.
Creating Your First Jenkins Job
Creating a basic job in Jenkins helps you understand how automation works within the system. One of the simplest ways to get started is by creating a Freestyle Project.
Step by Step: Creating a Freestyle Job
1. Go to “New Item”
From the Jenkins dashboard, click New Item on the left panel.
2. Enter a Job Name
Provide a meaningful name for the job, for example:
First-Jenkins-Job
3. Select “Freestyle Project”
Choose the Freestyle Project option and click OK.
Configuring the Job
1. General Settings
Add a short description if needed.
This helps identify the job’s purpose.
2. Source Code Management (Optional)
If you want Jenkins to pull code from GitHub or any repository, enter the repository URL here.
This step is optional for a simple test job.
3. Build Steps
Scroll down to the Build section and click Add build step → Execute shell (or Execute Windows batch command).
Add a simple command such as:
echo "Hello from Jenkins"
This verifies that Jenkins can run shell commands.

Running the Job
Click Save.
Click Build Now on the left side.
A new build will appear in the Build History section.
Viewing Build Output
Click on the build number (e.g., #1).
Then click Console Output to view:
The executed commands
The output generated
Success/failure status
If everything is configured correctly, the console will display:
Hello from Jenkins

Jenkins Pipeline Basics
Jenkins Pipelines allow you to define your entire build, test, and deployment process as code. This approach is more flexible and maintainable than traditional Freestyle projects.
What is a Jenkins Pipeline?
A Jenkins Pipeline is a set of automated steps written as code that defines how your application should be built, tested, and deployed.
Pipelines are written using a file called the Jenkinsfile, which is stored inside the project’s repository. This makes your CI/CD process version controlled and portable.
Types of Jenkins Pipelines
1. Declarative Pipeline
More structured and beginner friendly
Uses a predefined syntax
Recommended for most use cases
Example:
pipeline {
    agent any
    stages {
        stage('Build') {
            steps {
                echo "Building the application"
            }
        }
        stage('Test') {
            steps {
                echo "Running tests"
            }
        }
    }
}
2. Scripted Pipeline
More flexible
Uses full Groovy scripting
Preferred for advanced automation
Not required for beginners
Key Components of a Pipeline
1. Agent
Specifies where the pipeline will run (any agent, specific node, or Docker container).
2. Stages
Represents major phases of the pipeline such as build, test, deploy.
3. Steps
Commands executed inside each stage, for example:
Shell commands
Scripts
Tool executions
4. Post Section
Defines actions that should run after the pipeline completes (success or failure).
Why Pipelines Matter
The pipeline is stored as code inside the repository
Easier to review, update, and maintain
Supports complex workflows
Reliable and repeatable builds
Essential for real-world CI/CD setups
Integrating Jenkins with Git/GitHub
Integrating Jenkins with Git or GitHub allows Jenkins to automatically pull the latest code changes and build the project whenever updates are made. This integration is a core part of Continuous Integration (CI).
Prerequisites
Before integrating:
Jenkins must have the Git plugin installed.
Git should be installed on the Jenkins agent (or controller if jobs run there).
You should have a GitHub repository URL available.
Configuring Git Integration in a Jenkins Job
1. Open Your Jenkins Job
Go to the job where you want to set up Git integration, or create a new job.
2. Navigate to “Source Code Management”
Inside the job configuration page, scroll to the Source Code Management section and select Git.
3. Add Repository URL
Paste your GitHub repository URL, for example:
https://github.com/username/repository.git
If the repository is private, you will need to add credentials from Jenkins → Credentials.
4. Specify Branch
Specify the branch Jenkins should use, typically:
*/main
or
*/master
Setting Up Webhooks (Optional but Recommended)
Webhooks allow GitHub to notify Jenkins automatically when code is pushed.
Steps:
Open your GitHub repository.
Go to Settings → Webhooks → Add webhook.
Add your Jenkins webhook URL:
http://<jenkins-server-url>/github-webhook/
Select Just the push event.
Save the webhook.
Now, every time code is pushed, Jenkins gets notified immediately.
Verifying the Integration
After you configure Git:
Trigger a Build Now from Jenkins.
Jenkins will clone the repository.
You can view the Git commands and output inside the Console Output.
This integration ensures your build pipeline always uses the latest code and supports fully automated CI workflows.
Build Triggers
Build triggers in Jenkins define when and how a job should start automatically. Instead of manually clicking “Build Now,” you can instruct Jenkins to run jobs based on specific conditions or events. This is an essential part of CI/CD automation.
Common Types of Build Triggers
1. Trigger Builds Remotely or Manually
This is the simplest method where you manually start a build by clicking Build Now.
Useful for testing or on demand tasks.
2. Build After a Code Push (GitHub Webhook Trigger)
Using GitHub webhooks, Jenkins can automatically start a job whenever code is pushed to the repository.
Process:
Developer pushes code
GitHub sends a notification to Jenkins
Jenkins pulls the latest code and runs the job
This is widely used in Continuous Integration pipelines.
3. Poll SCM (Source Code Management)
Jenkins periodically checks the repository for any changes. If it detects a change, it triggers a build.
Example schedule (every 5 minutes):
H/5 * * * *
This option does not require webhooks, but it is less efficient since Jenkins actively checks the repository.
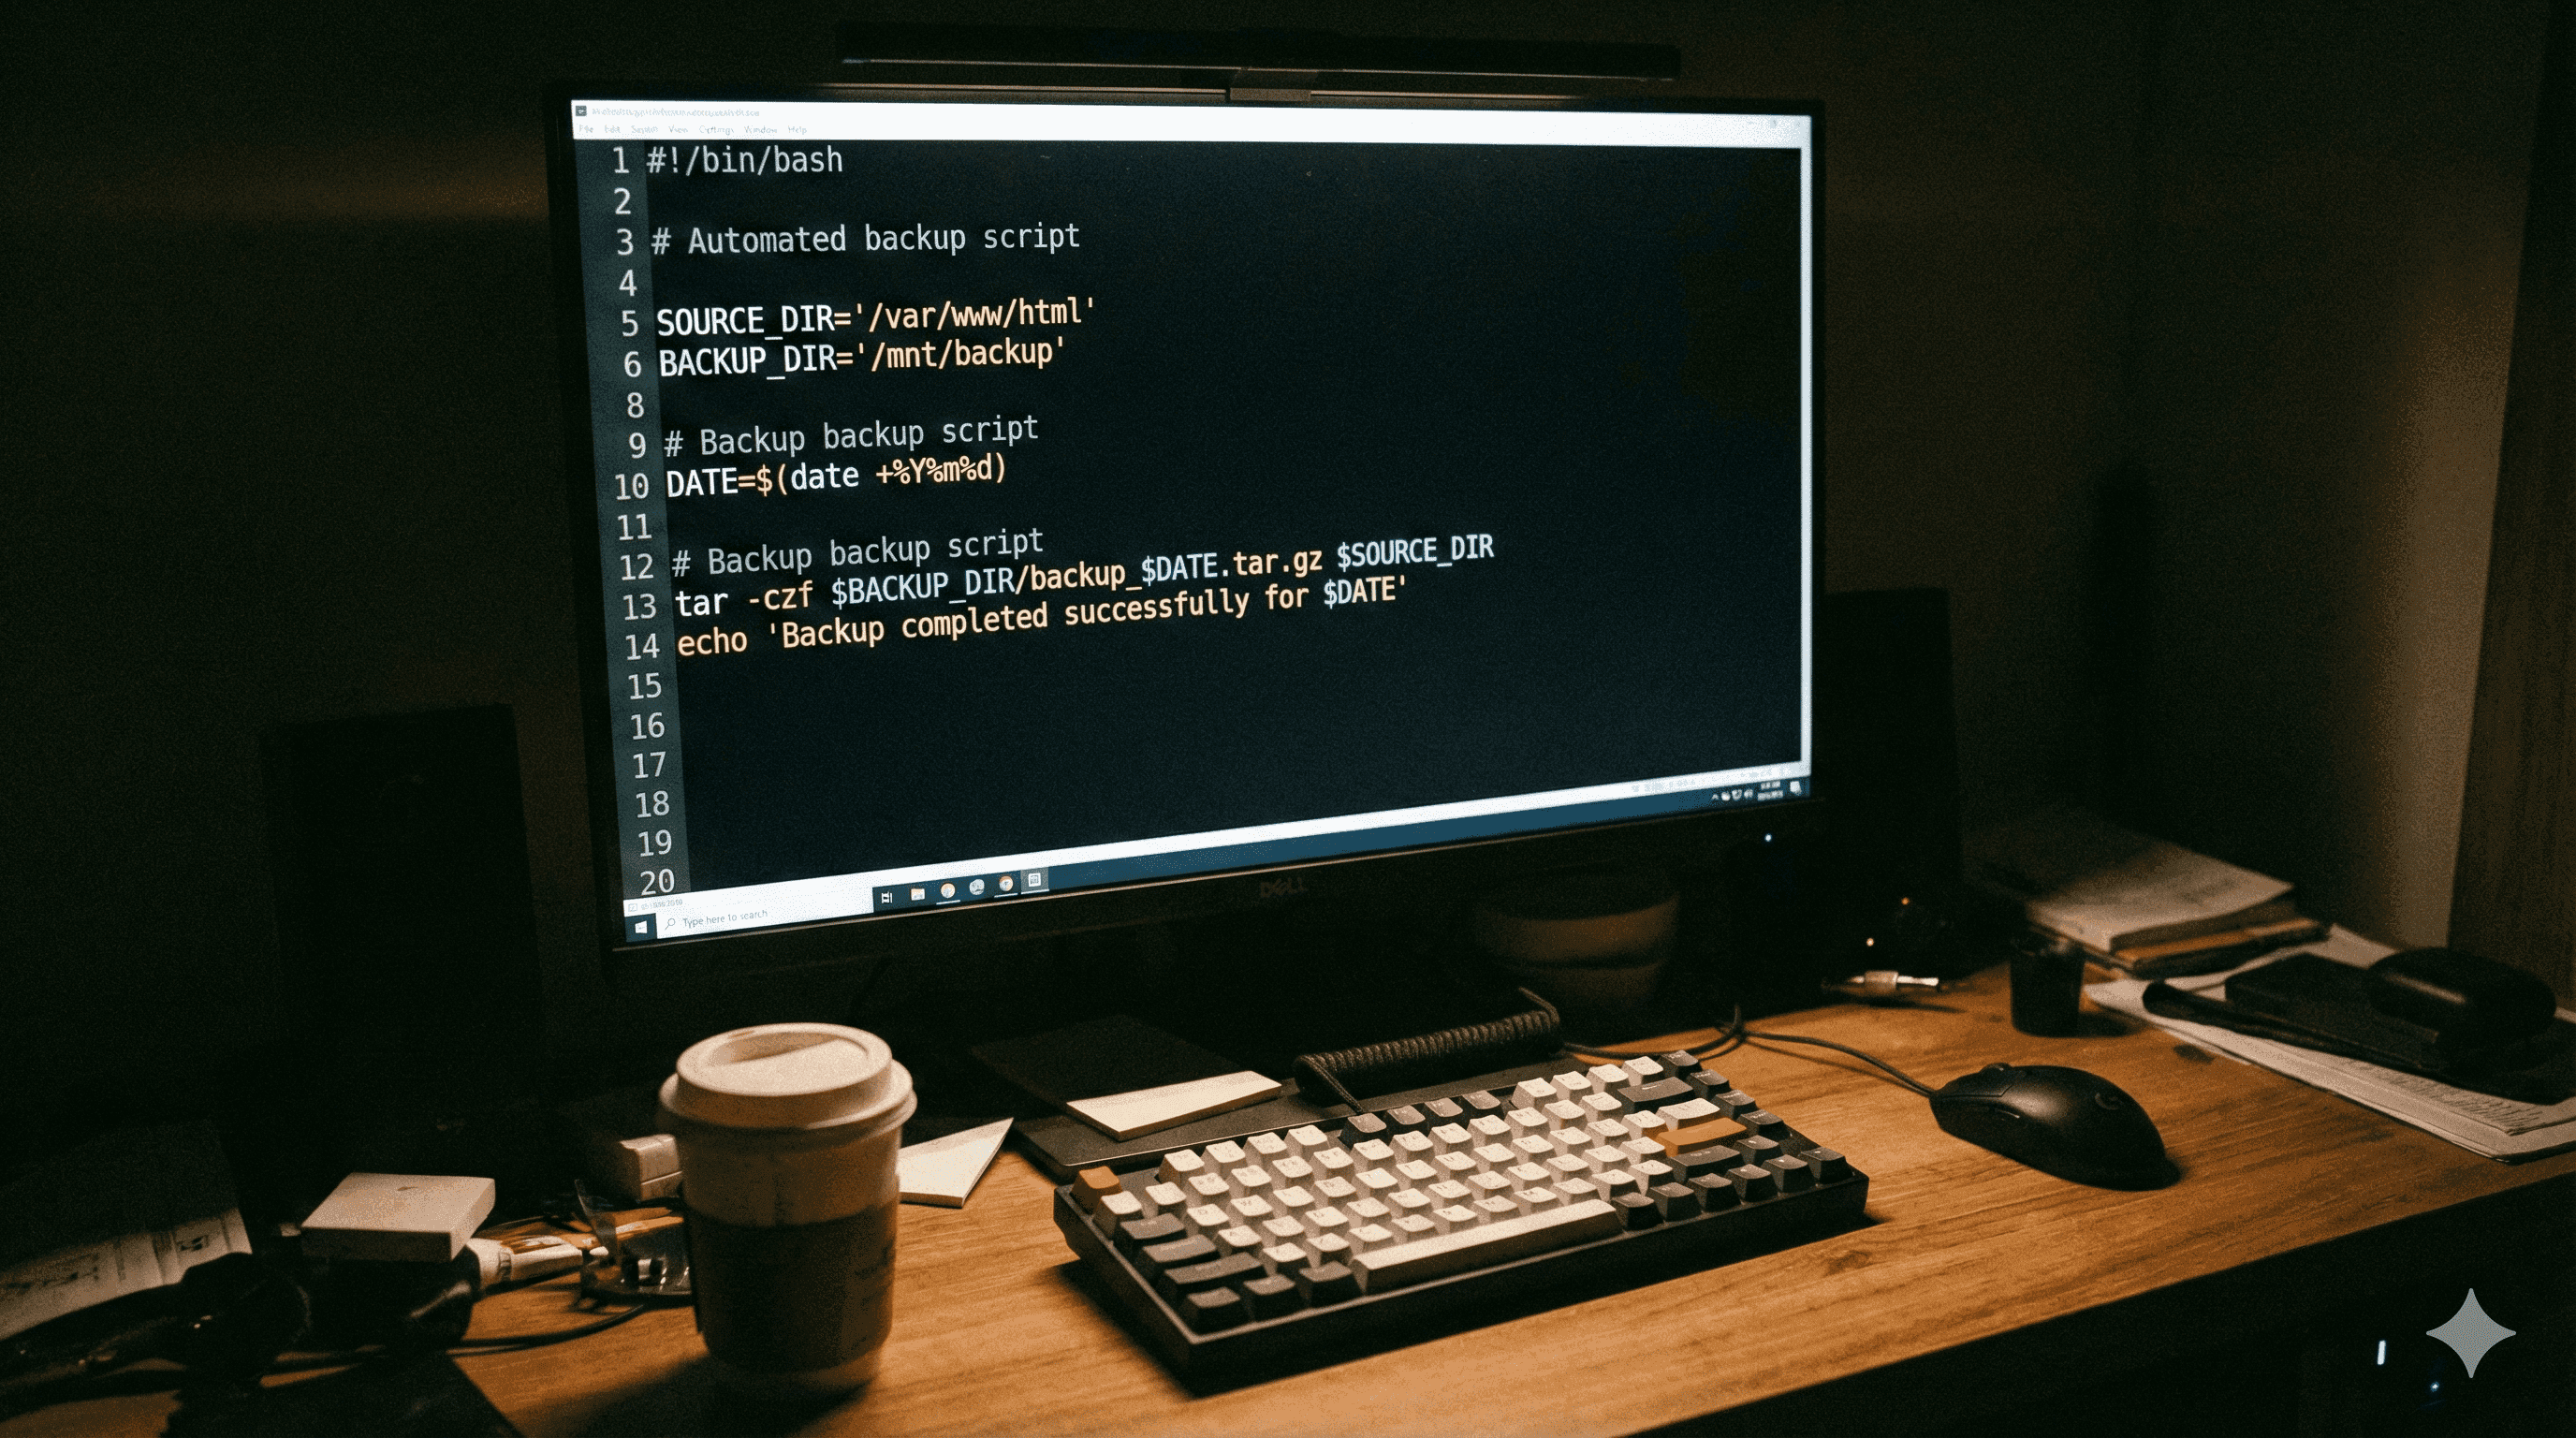
4. Scheduled Builds (CRON Jobs)
You can schedule jobs using CRON syntax.
Examples:
Every day at midnight:
0 0 * * *Every 15 minutes:
H/15 * * * *
Useful for periodic tasks like backups, scans, cleanup jobs, or nightly builds.
5. Trigger by Upstream/Downstream Projects
A job can be configured to run automatically after another job finishes.
Example:
Job A builds the code
Job B automatically deploys it after Job A succeeds
This helps create multi-step pipelines.
Why Build Triggers Are Important
Reduce manual work
Ensure faster feedback to developers
Maintain continuous and automated workflows
Enable reliable CI/CD processes
Important Jenkins Plugins
Jenkins’ power comes largely from its extensive plugin ecosystem. Plugins extend Jenkins’ capabilities, allowing integration with various tools, environments, and workflows. As a fresher, knowing the most commonly used plugins is sufficient to get started.
1. Git Plugin
Enables Jenkins to interact with Git repositories.
Supports cloning, pulling, and managing branches.
Essential for CI/CD pipelines that depend on version control.
2. Pipeline Plugin
Provides support for Jenkins Pipeline as code (Jenkinsfile).
Allows defining build, test, and deployment stages in a structured way.
Necessary for creating Declarative and Scripted pipelines.
3. GitHub Integration Plugin
Simplifies integration with GitHub repositories.
Supports webhooks for automatic build triggers on code pushes.
Provides status reporting back to GitHub.
4. Docker Plugin (Optional for Beginners)
Enables Jenkins to build and run Docker containers.
Useful for containerized applications and DevOps workflows.
5. Email Extension Plugin
Allows sending email notifications based on build results.
Can be configured to alert developers in case of build failures.
6. Slack Notification Plugin (Optional)
Sends build notifications to Slack channels.
Useful for team collaboration and monitoring build status.
Why Plugins Matter
Extend Jenkins’ functionality to fit your project needs
Simplify integration with other tools
Enable automation beyond basic builds
Make Jenkins suitable for real-world CI/CD pipelines